Showing posts with label trapezium. Show all posts

Tuesday, October 18, 2016

Chapter 18.3 - Division of Lines - Solved examples

In the previous section we saw the method to divide any line in any given ratio. We also saw two solved examples. In this section, we will see some more solved examples.

Solved example 18.3
In fig.18.15(a), ABCD is a rectangle. It's sides are not given.
Fig.18.15
.b)Draw another rectangle which have the same ratio of sides, and with a perimeter 3 cm greater than that of ABCD
Solution:
First we will bring the width BC 'in line' with the length AB. For that, the following steps (see fig.8.15.b) have to be done:
1. Extend AB to a convenient length AC'
2. With B as centre, and BC as radius,  draw an arc (shown in yellow colour)  cutting AC' at C''
3. BC'' is equal to BC, and is 'in line' with AB
4. So AC'' is 'half the perimeter' of the original rectangle ABCD
5. Draw a line AP' in any convenient direction towards the bottom side of AB
6. Bring AC'' on to this new line. For that, with A as centre, and AC'' as radius, draw an arc (shown in white colour) cutting AP' at P''.
7. So AP'' = AC'' = half of original perimeter

• Now, the 'new perimeter' has to be greater by 3 cm. So 'new half perimeter' is to be greater by 1.5 cm.
■ That is., new half perimeter = original half perimeter + 1.5. The derivation is given below:
(i) Original half perimeter = original perimeter⁄2
(ii) New half perimeter = new perimeter⁄2
(iii) But new perimeter = original perimeter + 3
(iv) Substituting (iii) in (ii) we get: 
new half perimeter = (original perimeter + 3)⁄2 
⇒ new half perimeter = original perimeter⁄2 + 3⁄2
⇒ new half perimeter = original half perimeter + 1.5

8. So we have to increase AP'' by 1.5 cm. For that, mark p''' at a distance 1.5 cm from P''. Thus, AP''' is the 'new half perimeter'
9. We have to divide AP''' in the ratio AB:BC. Let the point of division be P
10. Then AP:PP''' = AB:BC = AB:BC'' (∵ BC = BC'')
11. That is., we have to divide AP''' in the ratio AB:BC''
12. For that, first join C'' and P'''. Then draw it's parallel through B. This parallel will intersect AP''' at P. So we have two red parallel lines cutting through AP'' and AC'''. The ratios are equal. That is., AB:BC'' = AP:PP'''
13. Now draw a perpendicular PQ' at P. With P as centre, and PP''' as radius, draw an arc, cutting PQ' at Q
14. Draw QR parallel ro AP, and AR parallel to PQ. APQR is the required rectangle


Solved example 18.4
Draw an 8 cm long line and divide it in the ratio 2:3
Solution:
The construction is shown in the fig.18.16 below:
Fig.18.16. Length of AB = 8 cm
The steps can be written as follows:
• AB is the 8 cm long line. We have to divide it an in the ratio 2:3. Let E be the point of division. 
• So if AB is divided into 5 equal parts, AE will take up 2 such equal parts, and BE will take up 3 such equal parts.
• So AE = 2 × 8⁄5 = 16⁄5 = 31⁄5 and BE = 3 × 8⁄5 = 24⁄5 = 44⁄5 .
1. Draw a line AC of length 5 cm (∵ 2+3 = 5) in any convenient direction.
2. Mark a point D at a distance of 2 cm from A
3. Join B and C. Draw a line DE parallel to BC through D.
4. Then AE: BE = 2:3

Solved example 18.5
Draw a rectangle of perimeter 15 cm and sides in the ratio 3:4
Solution:
1. Draw a line AB (see fig.18.17 below) of length 15 cm, and divide it at E in such a way that AE:BE = 3:4

Fig.18.17
The steps for this division is same as that for the previous problem. We will write them again:
• Draw a line AC of length 14 cm  (∵ 2 times the sum of 3 and 4 is 14) in any convenient direction.
• Mark a point D at a distance of 6 cm from A
• Join B and C. Draw a line DE parallel to BC through D.
• Then AE : BE = 3:4

• Note that we took AC = 14 cm instead of 7. This is because, 7 is small compared to 15, and so, we will have to draw very slanted lines, which may reduce accuracy. However, the reader is advised to try that also.
• When we use 14 cm instead of 7, AD should be 6 instead of 3, and also, DC should be 8 instead of 4

2. Draw EP’ perpendicular to AB
3. With E as centre, and EA as radius, draw an arc, cutting EP’ at P
4. Draw PQ parallel to AB and BQ parallel to EP
5. BEPQ is the required rectangle

[Note that from the examination point of view, it may be sufficient to show the construction alone. The steps need to be written only if they are specifically required]

Solved example 18.6
Draw triangles specified below, each of perimeter 10 cm
(i) Equilateral triangle (ii) Sides in the ratio 3:4:5 (iii) Sides in the ratio 2:3:4
Solution:
(i) The perimeter is given as 10 cm. So draw a line AB 10 cm long. See fig.18.18 below:
Fig.18.18. Length of AB = 10 cm
1. Divide the line AB in the ratio 1:1:1. This ratio is to be used because, we want 3 equal sides for an equilateral triangle. The steps for this division are as follows:
• Draw a line AC of length 9 cm  (∵ 9 is comparable with 10, and can be easily divided into 3 equal parts) in any convenient direction.
• Mark a point E at a distance of 3 cm from A. Also another point D at a distance of 3 cm from E
• Join B and C. Draw a lines DG and EF parallel to BC.
• Then AF : FG : BG = 3:3:3 = 1:1:1
2. We will fix FG as the base and fold the segments AF and BG downwards to form the triangle. See fig.b
3. With F as centre, and AF as radius, draw an arc (shown in green colour)
4. With G as centre, and BG as radius, draw another arc (shown in white colour)
5. The two arcs will intersect at H
6. HGF is the required triangle
(ii) The perimeter is given as 10 cm. So draw a line AB 10 cm long. See fig.18.19 below:
Fig.18.19. Length of AB = 10 cm
1. Divide the line AB in the ratio 3:4:5. The steps for this division are as follows:
• Draw a line AC of length 12 cm  (∵ 3+4+5 =12) in any convenient direction.
• Mark a point E at a distance of 3 cm from A. Also another point D at a distance of 4 cm from E
• Join B and C. Draw a lines DG and EF parallel to BC.

• Then AF : FG : BG = 3:4:5
2. We will fix FG as the base and fold the segments AF and BG downwards to form the triangle. See fig.b
3. With F as centre, and AF as radius, draw an arc (shown in green colour)
4. With G as centre, and BG as radius, draw another arc (shown in white colour)
5. The two arcs will intersect at H
6. HGF is the required triangle
(iii) The perimeter is given as 10 cm. So draw a line AB 10 cm long. See fig.18.20 below:
Fig.18.20. Length of AB = 10 cm
1. Divide the line AB in the ratio 2:3:4. The steps for this division are as follows:
• Draw a line AC of length 9 cm  (∵ 2+3+4 =12) in any convenient direction.
• Mark a point E at a distance of 2 cm from A. Also another point D at a distance of 3 cm from E
• Join B and C. Draw a lines DG and EF parallel to BC.
• Then AF : FG : BG = 2:3:4
2. We will fix FG as the base and fold the segments AF and BG downwards to form the triangle. See fig.b
3. With F as centre, and AF as radius, draw an arc (shown in green colour) 
4. With G as centre, and BG as radius, draw another arc (shown in white colour)
5. The two arcs will intersect at H
6. HGF is the required triangle

Solved example 18.7
The fig.18.21(a) shows a non-isosceles trapezium.
Fig.18.21
It's diagonals intersect at P. Prove that PA × PD = PB × PC
Solution:

■ The fig.a shows a non-isosceles trapezium. Whether it is an isosceles trapezium, or a non-isosceles trapezium, the top and bottom sides will be parallel. So AB and DC are parallel
1. Through P, draw a red line parallel to AB. This is shown in fig.b
2. Now there are 3 parallel lines: AB, 'the red line' and DC
3. These three parallel lines cut through the diagonals AC and BD
4. The distances cut will be in the same ratio. So we get: PA:PC = PB:PD
5. ⇒ PA⁄PC = PB⁄PD ⇒ PA × PD = PB × PC
• It may be noted that, the above result is applicable to the two diagonals of any trapezium

One more solved example is given as a presentation video here:
It is a problem involving shadows cast by objects

In the next section, we will see Triangle Division.


PREVIOUS      CONTENTS       NEXT

                        Copyright©2016 High school Maths lessons. blogspot.in - All Rights Reserved

Tuesday, May 31, 2016

Chapter 12.3 - Construction of Non Isosceles Trapeziums

In the previous section we learned the construction of Isosceles Trapezium. In this section, we will learn the construction of Non Isosceles Trapezium.

Construction of Non Isosceles Trapezium

A Non Isosceles Trapezium is shown in the fig.12.15
Fig.12.15
The properties of this type of Trapezium are:
• Only one pair of opposite sides are equal. In the fig.12, there are two pairs of opposite sides: (i) [AB, CD] and (ii) [AD, BC]. Out of these two pairs, only the sides in the first pair are parallel to each other. The sides AD and BC in the second pair are Non parallel
• Non parallel sides are not equal. We have seen above that AD and BC are non parallel. These two sides are not equal in length
• Angles on each parallel sides are not equal. In the fig.(b), the parallel sides are AB and CD. Consider them separately: 
   ♦ Consider side AB first. The angles on this side are ∠A and ∠B. These two angles are not equal. That is., ∠A ≠ ∠B. 
   ♦ Consider side CD. The angles on this side are ∠C and ∠D. These two angles are not equal. That is., ∠C ≠ ∠D
   ♦ Angles on non parallel sides are also not equal. That is., ∠A ≠ ∠D and ∠B ≠ ∠C
• Sum of the angles on each non parallel sides is equal 180o. In the fig., the non parallel sides are AD and BC. Consider them separately: 
   ♦ Consider side AD first. The angles on this side are ∠A and ∠D. Sum of these two angles is 180o. That is., ∠A + ∠D = 180o
   ♦ Consider side BC. The angles on this side are ∠B and ∠C. Sum of these two angles is 180o. That is., ∠C + ∠D = 180o
♦ Note that, this sum property is not applicable to angles on parallel sides
• Diagonals are not equal. AC and BD are not equal in length.

Now we will see a special feature of a Non Isosceles Trapezium:
In the previous section, we saw that, an isosceles triangle is hidden inside an isosceles trapezium. Here, in the case of non isosceles trapeziums also, a triangle is hidden. But this triangle is not an isosceles one. Let us try and find out if we can fix it's shape:
Fig.12.16
In the fig.(b), a line DE is drawn in such a way that, length of DE is equal to the length of BC. And also, DE makes the same angle ∠CBE with the base. That is.,
BC = DE - - - (1) and 
∠CBE = ∠DEA - - - (2)
So the line DE splits the trapezium ABCD into a triangle AED and a parallelogram EBCD. We have thus brought out the hidden triangle. It is ΔAED. Now we have to obtain the details required to construct this ΔAED. For that, we use the properties of a parallelogram. We know that in the parallelogram EBCD, EB = CD. So AE which is equal to AB – EB can be written as AE = AB – CD. In most cases, length of CD will be given because, it is the top parallel side. So, by subtracting the top parallel side from the bottom parallel side, we get the base of the hidden triangle AED 

So we have the lengths of all the three sides of the ΔAED. With those sides we can easily construct it. Once we complete the construction of ΔAED, we can easily complete the trapezium ABCD.  This will become more clear when we do a solved example:

Solved example 12.9
Construct a Trapezium in which Base = 7 cm, Top parallel side = 5 cm, and the non parallel sides equal to 4 cm and 3 cm
Solution: First step is to draw a rough sketch as shown in the fig.12.17(a)
Fig.12.17
Based on the rough sketch, we can proceed to do the construction

• Draw a horizontal line AB 7 cm in length
• The base of the hidden Triangle = AE = AB – CD = 7 – 5 = 2 cm
• With A as center, draw an arc of 2 cm radius (shown in green colour in fig.b), cutting AB at E. So we obtained corners A and E of the Triangle. 
• Now we want the other corner D. This D is at a distance of 4 cm from A, and 3 cm from E. So draw an arc with center A and radius 4 cm (shown in magenta colour in fig.b). Draw another arc with E as center and radius 3 cm (shown in yellow colour in fig.b).
• These two arcs will intersect at D. So we have obtained the third corner. We must now locate the remaining corner C
• DC is parallel to AB. So, through D, draw a line DC' of any convenient length, parallel to AB   
• With D as center, draw an arc (shown in white colour in fig.c) of radius 5 cm, cutting DC' at C.  Thus the remaining corner is also obtained. Join B to C. We get the required Trapezium ABCD

Solved example 12.10
Construct a Trapezium ABCD in which Base AB = 5 cm, Top parallel side CD = 4 cm, Non parallel side AD = 3 cm, and ∠A = 60o
Solution:
In this problem, length of one non parallel side is missing. Instead, we are given one Base angle. With those, we can indeed construct the Trapezium. The first step is to draw a rough sketch as shown in the fig. 12.18(a)
Fig.12.18
Based on the rough sketch, we can proceed to do the construction
• Draw a horizontal line AB, 5 cm in length
• Draw line AD' at an angle 60o with AB. Point D lies on this line at a distance of 3 cm from A
• With A as center, draw an arc of radius 3 cm, cutting AD' at D. This arc is shown in magenta colour in fig.(b)
• CD is parallel to AB. So draw a line DC' through C, and parallel to AB, for any convenient length
• With D as center, draw an arc (shown in green colour in fig.c) of radius 4 cm, cutting DC' at C
• Join C and B. We get the required trapezium ABCD

Solved example 12.11
Construct a Trapezium ABCD in which Base AB = 5 cm, ∠A = 60o, ∠B = 45o, and Non parallel side AD = 3 cm.
Solution:
In this problem, lengths of top parallel side CD, and one non parallel side BC, are missing. Instead, we are given two Base angles. With those, we can indeed construct the Trapezium. The first step is to draw a rough sketch as shown in the fig. 12.19(a)
Fig.12.19
Based on the rough sketch, we can proceed to do the construction
• Draw a horizontal line AB, 5 cm in length
• Draw line AD' at an angle 60o with AB. Point D lies on this line at a distance of 3 cm from A
• With A as center, draw an arc of radius 3 cm, cutting AD' at D. This arc is shown in magenta colour in fig.(b). So we get Corner D
• Draw line BC' at an angle 45o with AB. Point C lies on this line. But we do not know it's distance from B
• We know that CD is parallel to AB. So through C, draw a line CD parallel to AB.
• Extend this line until it meets the line BC' at C. Thus we get the required trapezium ABCD

Solved example 12.12
Construct a Trapezium ABCD in which Base AB = 5 cm, Top parallel side CD = 3cm, ∠A = 60o, and ∠B = 45o
Solution:
In this problem, lengths of non parallel sides BC and CA are missing. Instead, we are given the length of two parallel sides and the two Base angles. With those, we can indeed construct the Trapezium. The first step is to draw a rough sketch as shown in the fig. 12.20(a)
Fig.12.20
Based on the rough sketch, we can proceed to do the construction
• Draw a horizontal line AB, 5 cm in length
• Draw line AD' at an angle 60o with AB. Point D lies on this line.  But we do not know it's distance from A 
• Draw line BC' at an angle 45o with AB. Point C lies on this line. But we do not know it's distance from B
• In this problem, we have to bring out the hidden triangle AED. We know that AE = AB - CD = 5 - 3 = 2 cm
• With A as center, draw an arc or 2 cm radius, cutting AB at E. So we got the corners A and E of the hidden triangle AED. Now we have to locate the third corner D
• We know that ED will be parallel to BC. So draw a line (yellow dashed line in fig.c) parallel to BC through E
• This line intersets AD' At D. So we got all the corners of the hidden triangle. It also gives us the third corner D of the required trapezium ABCD. Now we need to locate the remaining corner C
• We know that CD is parallel to AB. So through C draw a line parallel to AB. This line will meet the line BC' at C. Thus we get the required trapezium ABCD

So we have learned to construct a Trapezium under four conditions:
■ When the lengths of all the sides are given
■ When the lengths of two parallel sides, one non parallel side, and one Base angle is given
■ When the lengths of  one parallel side, one non parallel side, and two Base angles are given
■ When the lengths of  two parallel sides and two Base angles are given

In the next section, we will learn the construction of  Quadrilaterals of various shapes.


PREVIOUS      CONTENTS       NEXT

                        Copyright©2016 High school Maths lessons. blogspot.in - All Rights Reserved

Friday, May 27, 2016

Chapter 12.2 - Construction of Isosceles Trapeziums

In the previous section we learned the construction of Parallelogram. Next we have to learn the construction of Trapeziums. These shapes are frequently used in Science and Engineering. For example, the road embankments for the transportation of vehicles, and canal sections for conveyance of water, are usually in the shape of Trapeziums. This is because, the sides of the trapezium, which are at an angle, will have more stability, than when they are vertical. So this shape is preferred over the 'rectangular shape'. There are two types of Trapeziums: (i) Isosceles Trapeziums and (ii) Non Isosceles Trapeziums. In this section, we will learn the construction of the Isosceles type.

Construction of an Isosceles Trapezium

An Isosceles Trapezium is shown in the fig.12.9. In the fig., (a), (b) and (c) shows the same Isosceles Trapezium. They are shown separately, only to avoid congestion of details.
Fig.12.9
The properties of this type of Trapezium are:
• Only one pair of opposite sides are equal. In the fig.12.(a), there are two pairs of opposite sides: (i) [AB, CD] and (ii) [AD, BC]. Out of these two pairs, only the sides in the first pair are parallel to each other. The sides AD and BC in the second pair are Non parallel
• Non parallel sides are equal. We have seen above that AD and BC are non parallel. These two sides are equal in length
• Angles on each parallel sides are equal. In the fig.(b), the parallel sides are AB and CD. Consider them separately: 
♦ Consider side AB first. The angles on this side are ∠A and ∠B. They are equal in measurement. That is., ∠A = ∠B.  
♦ Consider side CD. The angles on this side are ∠C and ∠D. These two angles are equal. That is., ∠C = ∠D
♦ The angles on the bottom side, A and B, are called the Base angles. So we can say: In an Isosceles Trapezium, base angles are equal
• Sum of the angles on each non parallel sides is equal 180o. In the fig., the non parallel sides are AD and BC. Consider them separately: 
♦ Consider side AD first. The angles on this side are ∠A and ∠D. Sum of these two angles is 180o. That is., ∠A + ∠D = 180o
♦ Consider side BC. The angles on this side are ∠B and ∠C. Sum of these two angles is 180o. That is., ∠C + ∠D = 180o
• Diagonals are equal. In the fig.12.9(c), AC and BD are equal in length.
♦ Note that, though they are equal, none of them bisect the other, and they are not perpendicular to each other.

Now we will see a special feature of Isosceles Trapezium:
Fig.12.10(a) shows an Isosceles Trapezium ABCD. Consider the non parallel side AD. It makes a certain angle ∠DAB with the base AB. 
Fig.12.10
In the fig.(b), A line DE is drawn in such a way that, length of DE is equal to the length of AD. And also, DE makes the same angle ∠DAB with the base. That is.,
AB = DE - - - (1) and 
∠DAB = ∠DEA - - - (2)
(1) and (2) are properties of an Isosceles Triangle:
Two sides equal, and the angles opposite to those equal sides (the base angles) also equal.
So ΔAED is an Isosceles Triangle. If we remove this isosceles triangle from the trapezium, what will remain? We can see that, the remaining portion EBCD is a parallelogram. So we can say that:
■ Every Isosceles Trapezium is made up of an Isosceles Triangle and a parallelogram
This is shown in fig.(c)
So, an Isosceles Triangle is hidden inside an Isosceles Trapezium. We can bring out that hidden triangle by drawing a ‘mirror image’ of the non parallel side.

Now we will see one more feature of Isosceles Trapezium:
In fig.12.11, the Isosceles Trapezium ABCD is already split into an Isosceles Triangle AED and a Parallelogram EBCD.
Fig.12.11
Now concentrate on the Parallelogram. Length of EB is equal to the length of CD (∵ since they are opposite sides of a parallelogram). This gives us a method to split the 'length of the base' of the Trapezium:
Length of the base AB of the Isosceles Trapezium = Length of the Top parallel side CD + Length of AE, the base of the Isosceles Triangle.

Rearranging the above, we get an equation for calculating the length of base of the hidden Isosceles triangle:
Base of the Isosceles Triangle = Total base of the Isosceles Trapezium – Top parallel side of the Trapezium

The above equation is very useful for the construction of an Isosceles Trapezium. We will see it’s application in a solved example.

Solved example 12.6
Draw an Isosceles Trapezium in which, Base = 6 cm, Top parallel side = 4 cm, and non parallel sides = 3 cm
Solution: First step is to draw a rough sketch as shown in the fig.12.12(a)
Fig.12.12
Based on the rough sketch, we can proceed to do the construction
• Draw a horizontal line AB, 6 cm in length
• The base of the hidden Isosceles Triangle = AE = AB – CD = 6 – 4 = 2 cm
• With A as center, draw an arc of 2 cm radius (shown in green colour in fig.b), cutting AB at E. So we obtained corners A and E of the Isosceles Triangle. 
• Now we want the other corner D. This D is at a distance of 3 cm from both A and E (∵ ΔAED is an isosceles triangle). So draw an arc with center A and radius 3 cm (shown in magenta colour in fig.b). Draw another arc with E as center and radius 3 cm (shown in yellow colour in fig.b).
• These two arcs will intersect at D. So we have obtained the third corner. This is also the third corner of the Trapezium. We must now locate the remaining corner C
• DC is parallel to AB. So, through D, draw a line DC' of any convenient length, parallel to AB   
• With D as center, draw an arc (shown in white colour in fig.c) of radius 4 cm, cutting DC' at C. Thus the remaining corner is also obtained. Join B to C. Thus we get the required Trapezium ABCD

Solved example 12.7
Draw an Isosceles Trapezium in which, Base = 7 cm, Top parallel side = 2 cm, and non parallel sides = 4 cm
Solution: First step is to draw a rough sketch as shown in the fig.12.13(a)
Fig.12.13
Based on the rough sketch, we can proceed to do the construction
• Draw a horizontal line AB, 7 cm in length
• The base of the hidden Isosceles Triangle = AE = AB – CD = 7 – 2 = 5 cm
• With A as center, draw an arc of 5 cm radius (shown in green colour in fig.b), cutting AB at E. So we obtained corners A and E of the Isosceles Triangle. 
• Now we want the other corner D. This D is at a distance of 4 cm from both A and E (∵ ΔAED is an isosceles triangle). So draw an arc with center A and radius 4 cm (shown in magenta colour in fig.b). Draw another arc with E as center and radius 4 cm (shown in yellow colour in fig.b).
• These two arcs will intersect at D. So we have obtained the third corner. This is also the third corner of the Trapezium. We must now locate the remaining corner C
• DC is parallel to AB. So, through D, draw a line DC' of any convenient length, parallel to AB 
• With D as center, draw an arc (shown in white colour in fig.c) of radius 2 cm, cutting DC' at C.  Thus the remaining corner is also obtained. Join B to C. Thus we get the required parallelogram ABCD

Solved example 12.8
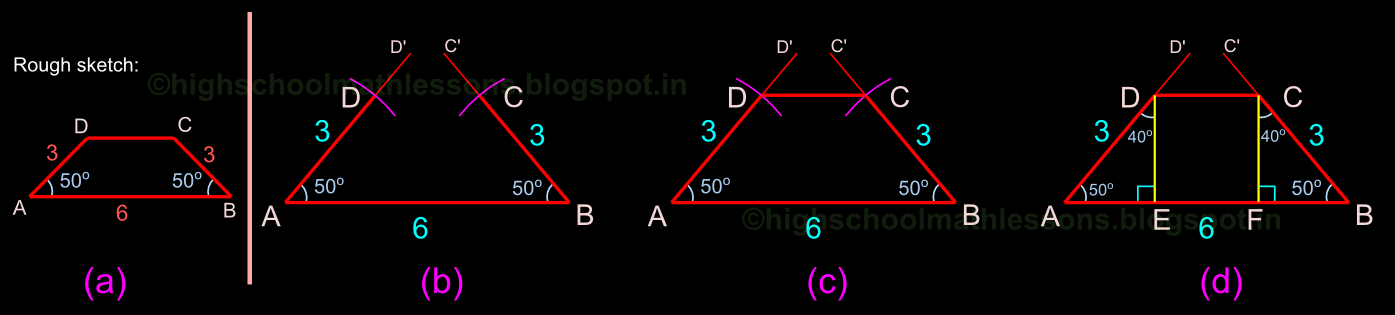
Construct an Isosceles Trapezium in which Base = 6 cm, Non parallel sides = 3 cm, and Base angles = 50o
Solution:
In the previous problem, we were given  lengths of all the sides. In this problem, length of one side (the top parallel side) is missing. Instead, we are given the Base angles. With those, we can indeed construct the Trapezium. The first step is to draw a rough sketch as shown in the fig. 12.14(a)


Based on the rough sketch, we can proceed to do the construction
• Draw a horizontal line AB, 6 cm in length
• Draw line AD' at an angle 50o with AB. Draw a line BC' at an angle 50o with AB
• With A as center, draw an arc of radius 3 cm, cutting AD' at D. With B as center, draw an arc of radius 3 cm, cutting BC' at C. These arcs are shown in magenta colour in fig.(a)
• Join D and C. Thus we get the Required Trapezium ABCD
■ CD must be parallel to AB. We can prove it in the following way:
• Draw DE Perpendicular to AB. So ∠AED = 90o. In the same way, draw CF perpendicular to AB. So ∠CFB = 90o
• Consider the ΔAED. In that triangle, ∠ADE = 180 - (90 + 50) = 40o (∵ sum of the three interior angles of a triangle = 180o). In the same way, ∠BCF is also equal to 40o
• In ΔAED, we have a side AD of 3 cm length, and with angles 50o and 40o at it's ends
• In ΔBFC, we have a side BC of 3 cm length, and with angles 50o and 40o at it's ends
• This is a case of ASA congruence. That is., ΔAED and ΔBFC are congruent
• We can write the correspondence:
• The sides that we considered are AD and BC. ∠A = ∠B = 50o. So A↔B
• ∠C = ∠D = 40o. So C↔D. The only remaining corners are E and F. So E↔F
• So ΔAED and ΔBFC are congruent under the correspondence: AED↔BFC
• From the above correspondence, we can write the corresponding sides: AE↔BF, ED↔FC, AD↔BC
• Out of the above three, consider ED↔FC. It indicates that, the two perpendiculars shown in yellow colour, are equal in length.
• So the corners D and C are at the same distance from AB. That is., CD is parallel to AB 

We have learned to construct an Isosceles Trapezium under two conditions:
■ When the lengths of all the sides are given
■ When the lengths of Base, Non parallel sides, and Base angles are given

In the next section, we will learn the construction of  Non Isosceles Trapeziums.


PREVIOUS      CONTENTS       NEXT

                        Copyright©2016 High school Maths lessons. blogspot.in - All Rights Reserved